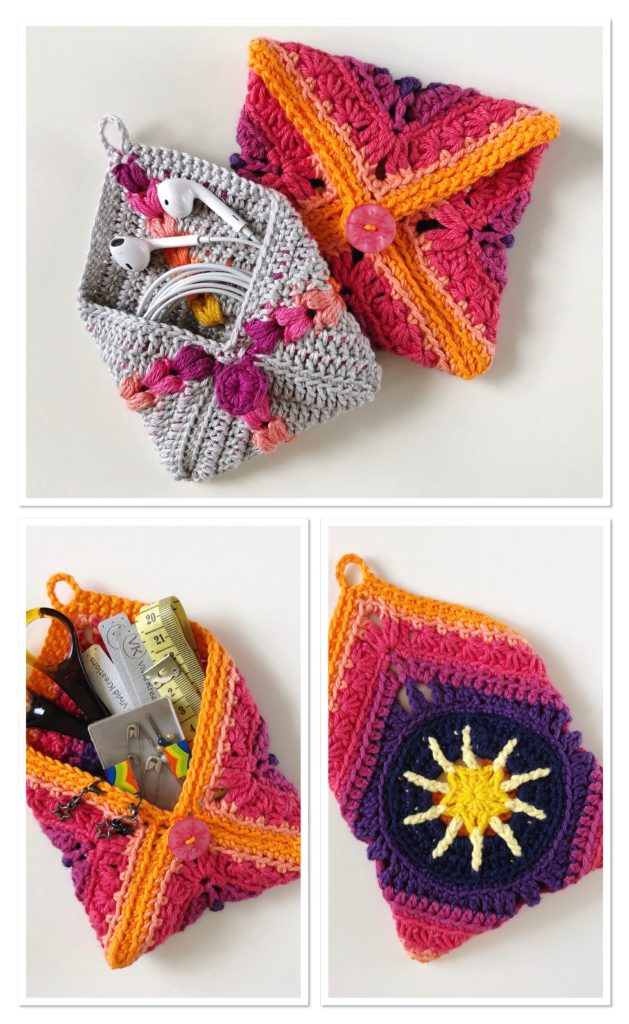
 Wow! I did not expect my little earbud pouch to be so popular.
Seriously, you guys are blowing my mind with the love for it 💕🤯 💕
So to say thank you I have whipped up a really quick tutorial for the pouch. Plus I’ve given you some pointers for how to adapt it for squares with different stitch counts.
I have also created a PDF which you can buy from Etsy or Ravelry if you would like to support my work or print the tutorial out. The PDF also includes extra tips and a chart.
Oh and before I continue, the square pattern I used for the original pouch is by the wonderful Celine of @crafty_cc and you can get her beautiful pattern on her blog.
The square I am using for this tutorial is my Tiny Star Square, available on Etsy, Ravelry and Love Crochet.
Both of these squares, and 98 others amazing squares, are available later in the Ultimate Granny Square Source Book.
 The Ultimate Granny Square Sourcebook is available now!
So click on the link below to get your copy of this beautiful book with 100 squares which mix and match, by 23 different designers from all around of wonderful world.
Buy now – Granny Square Sourcebook
So on to the fun part…
Crochet Pouch Tutorial
What you will need.
- A crochet square. For this one I am using my Tiny Star Square pattern which ends with a final stitch count of 112 sts. You can use any square you like and I have included how to adjust the pouch pattern to accomodate different stitch counts.
- Crochet hook to match your yarn and square. I used a 4mm (G) hook.
- Yarn to match your square. I used Paintbox Cotton DK in Seville Orange.
- A button. Go through your button collection or make a crochet button! My button for the Rainbow Puff Square was crocheted using a tutorial I found on Pinterest and I used a 20mm (3/4in) pink button from my stash for the Tiny Star Square pouch.
- Yarn needle, 2 stitch markers or safety pins and scissors.
How to turn your square into a pouch.
- Lay your square wrong side up on a flat surface. Fold up one corner towards the centre, then fold the corner to the right towards the centre and use a stitch marker or safety pin to hold them together. Repeat with the corner to the left of the first one. This makes the pouch shape. The corner left unfolded will become the flap.
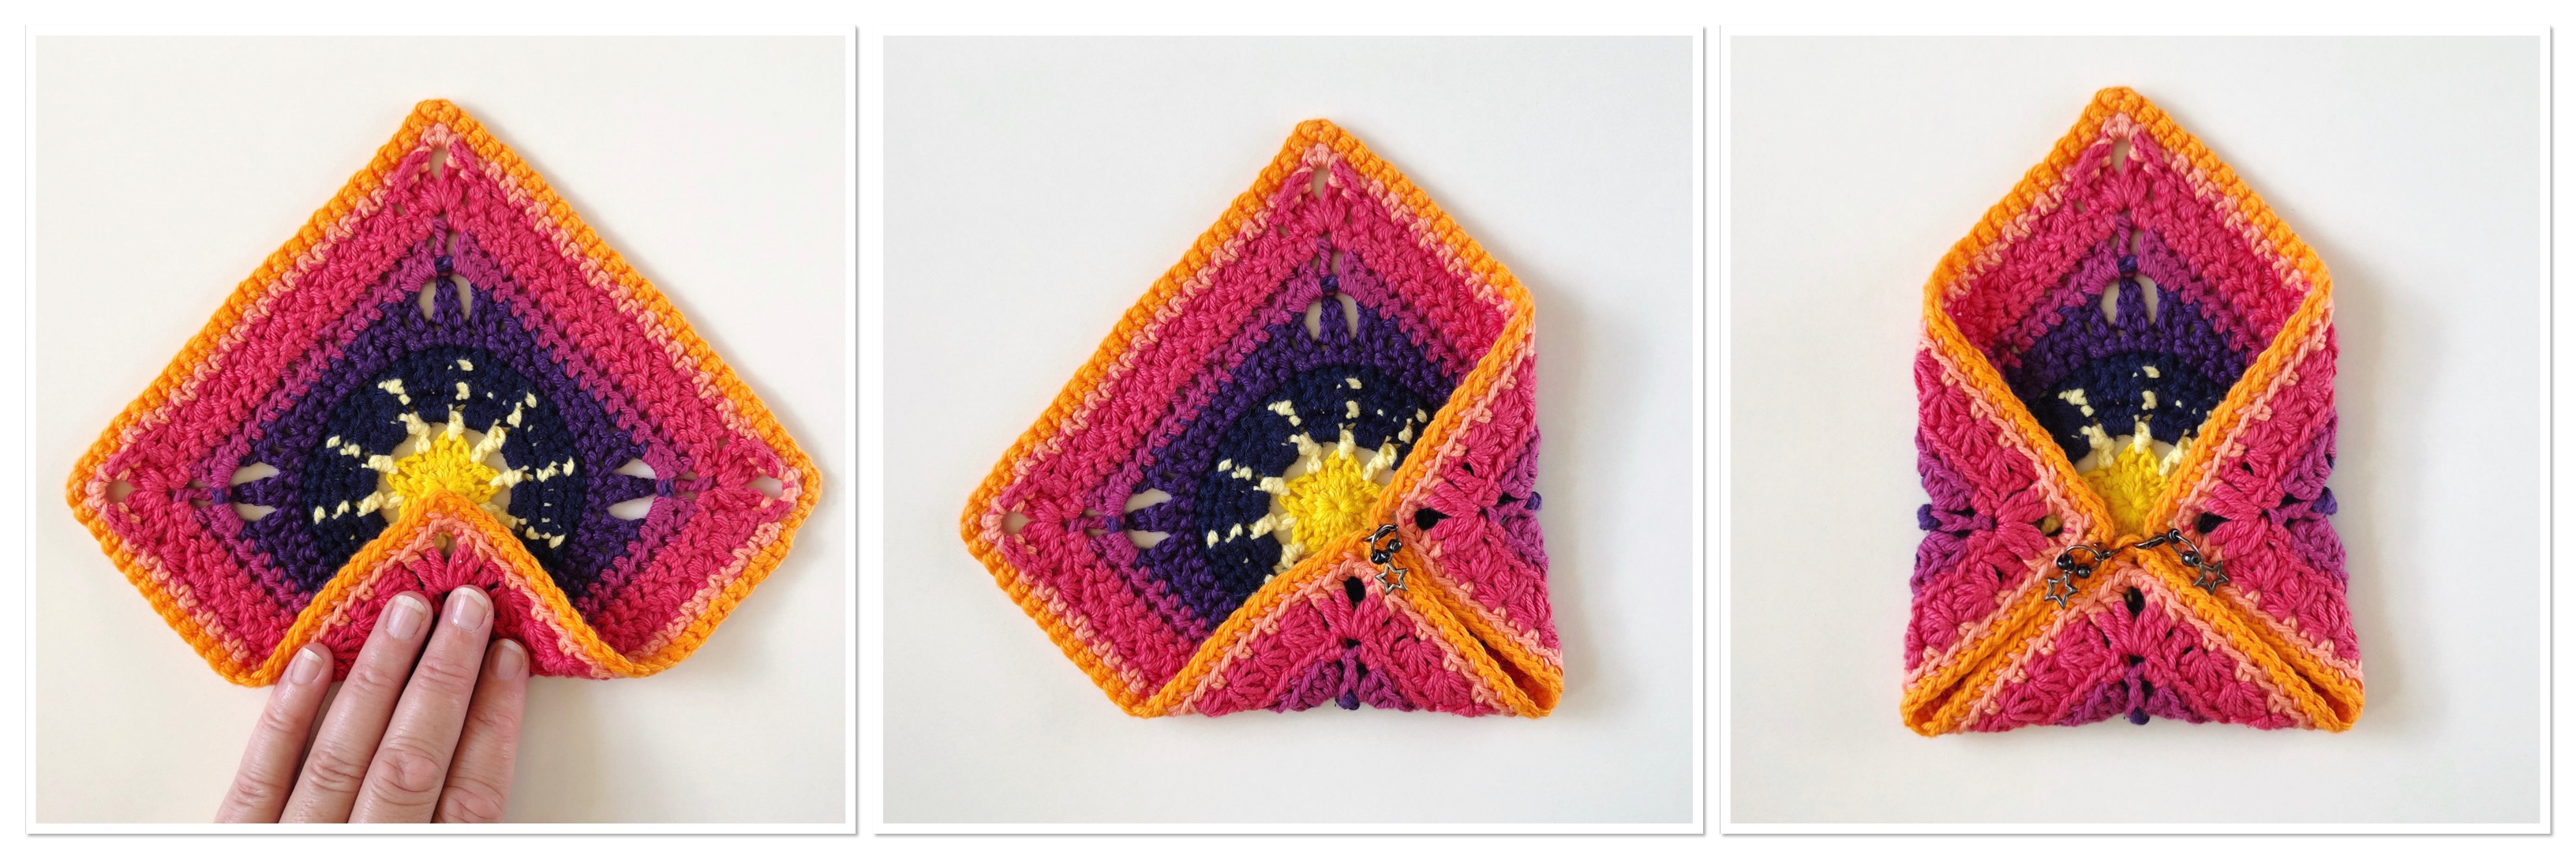
2. Turn your pouch inside out. You will be crocheting along the edges where the folded flaps meet, starting on the right bottom corner, up to the the centre where all 3 flaps meet and down to the left bottom corner.
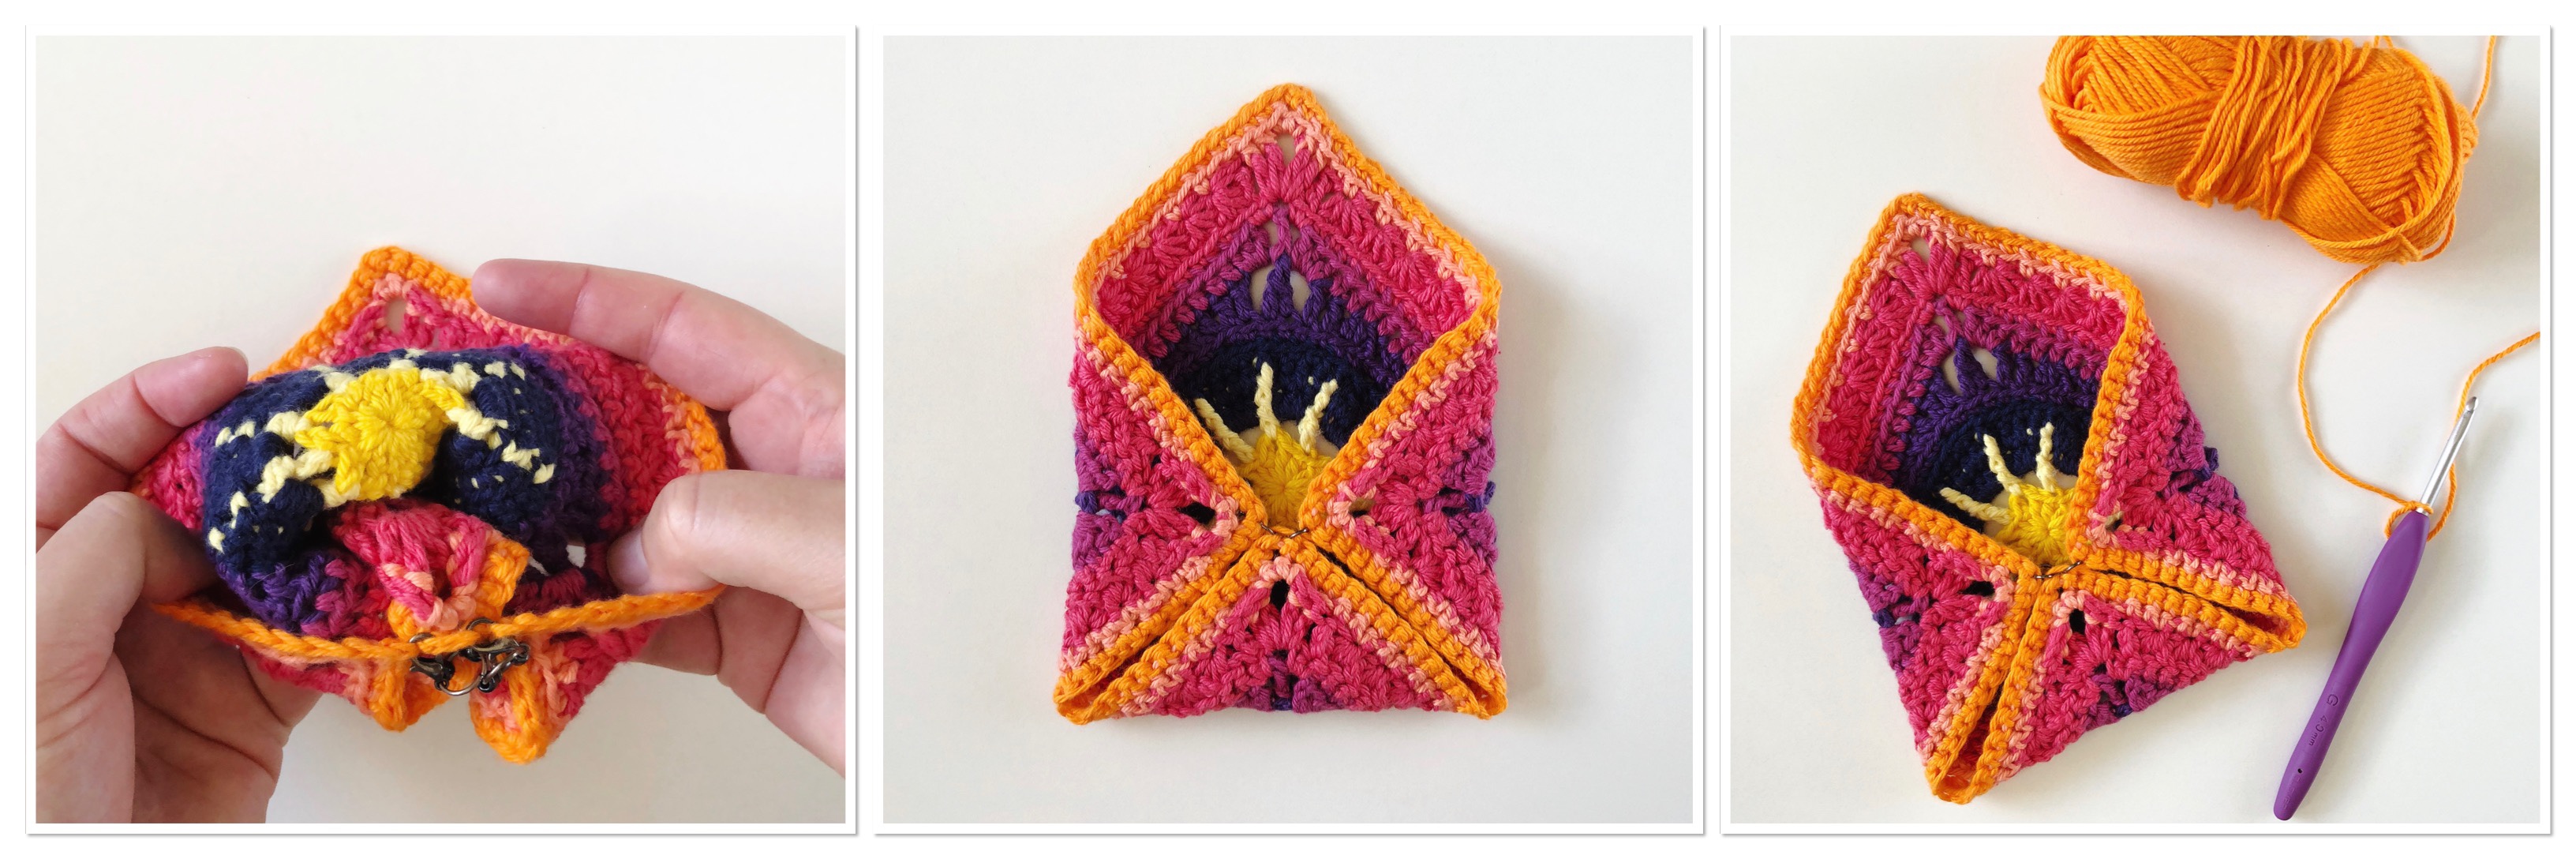
3. With a slip knot on your hook, insert your hook through the front loops (the ones on the side facing you) of the 2 stitches in the bottom right corner. These 2 stitches would be the middle 2 stitches of your square before we folded it into a pouch. *see note below.
Yo and pull a loop through both sts, yo and finish your first sc.
Sc in the flo of the next pair of sts.
Sc in the flo of the next 12 pairs of sts.
You will now be in the centre where the 3 flaps meet.
(14 scs)
*Note: My square has 28 sts per side. 28 divided by 2 = 14 so I counted down 14 sts from the corner on each side of the where we are joining to make sure I was in the exact centre.
If your square has a different stitch count, simply divide the number of stitches along 1 side by 2 to find your centre.
Eg. 30 / 2 = 15 so count down 15 stitches on either side.
20 / 2 = 10 so count down 10 sts on either side.
If your square has an odd number of stitches per side, slip stitch in the middle stitch then join the remaining pairs of sts as written below.
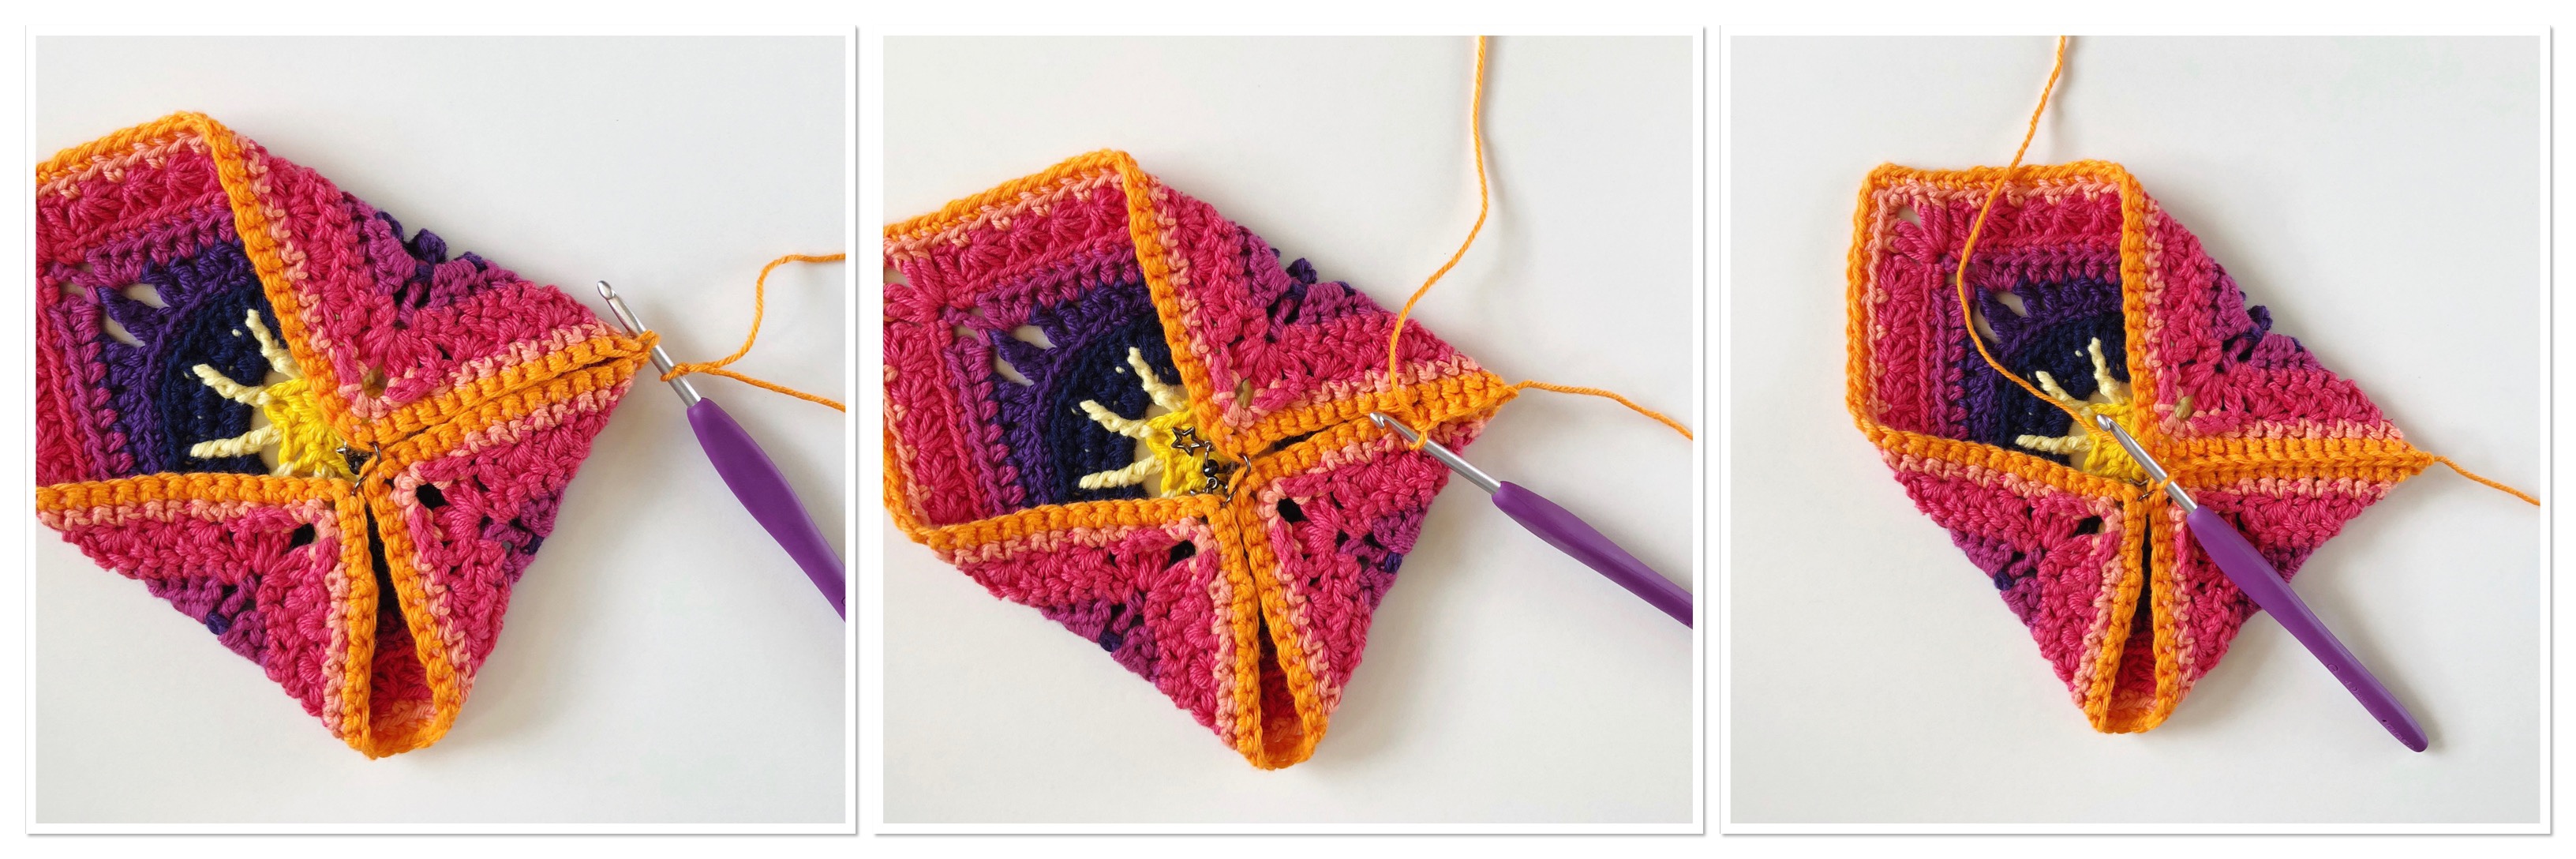
4. Sc in the flo of the next st of the middle flap and the corresponding st in the corner of the flap on the left.
Sc in the flo of the next 13 pairs of sts.
You will now be in the bottom left corner and your final sc should be in the last 2 sts.
Cut your yarn and weave in your ends.
(14 scs)
You can now turn your work back the right way out!
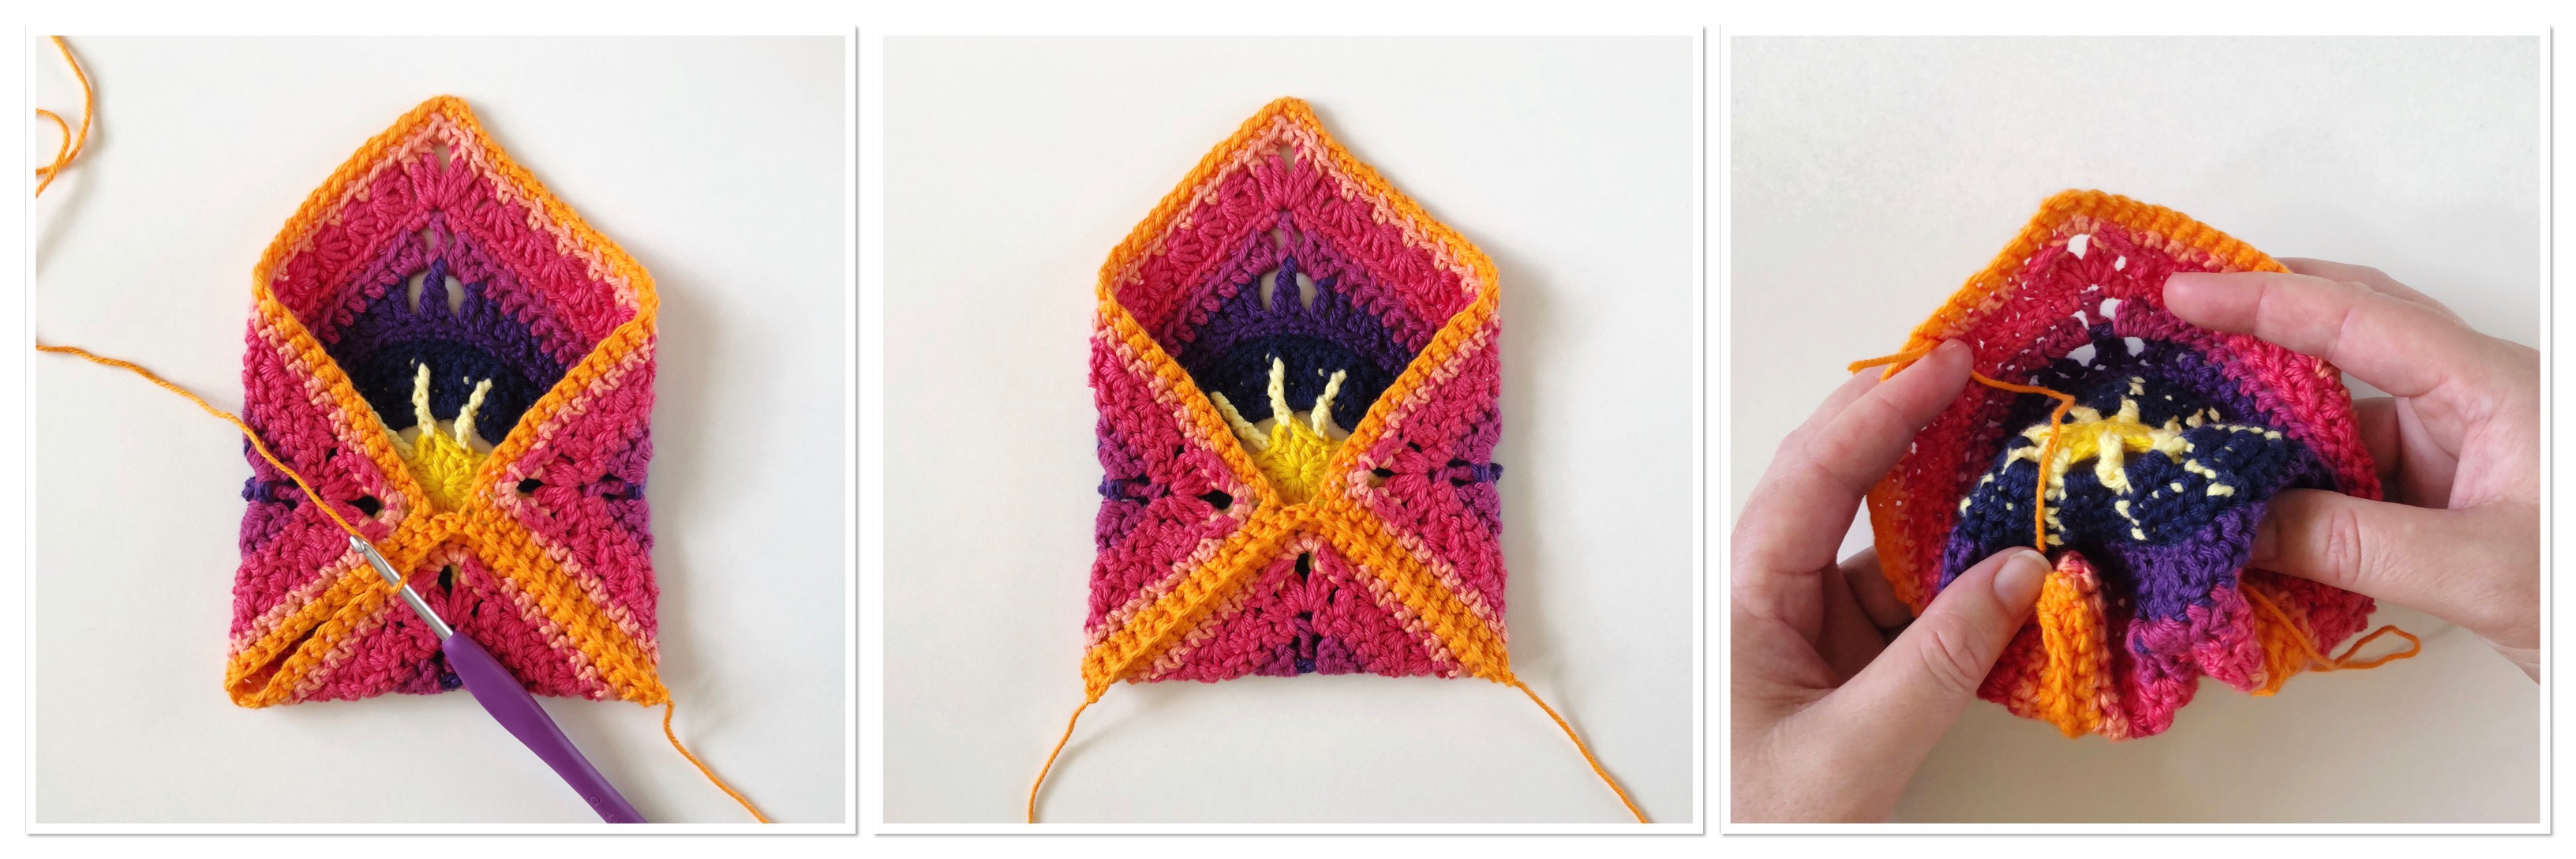
5. With a slip knot on your hook, insert your hook through the blo of the same st as the beginning of the join on the left of the centre flap.
*If you prefer you can do all of this part through both loops as the blo is purely decorative here.
Yo, pull up a loop and complete the first sc.
Sc in the blo of the next st (this will be same st as the beginning of the join on the left flap).
Sc in the blo of the next 27 sts. *if your square has a different stitch count it will be however many sts are on 1 side of your square minus 1. Essentially we are crocheting up to the corner of the flap that will close our pouch.
Sc through both loops of the next st (this is the last st on this side of the square).
(30 scs)
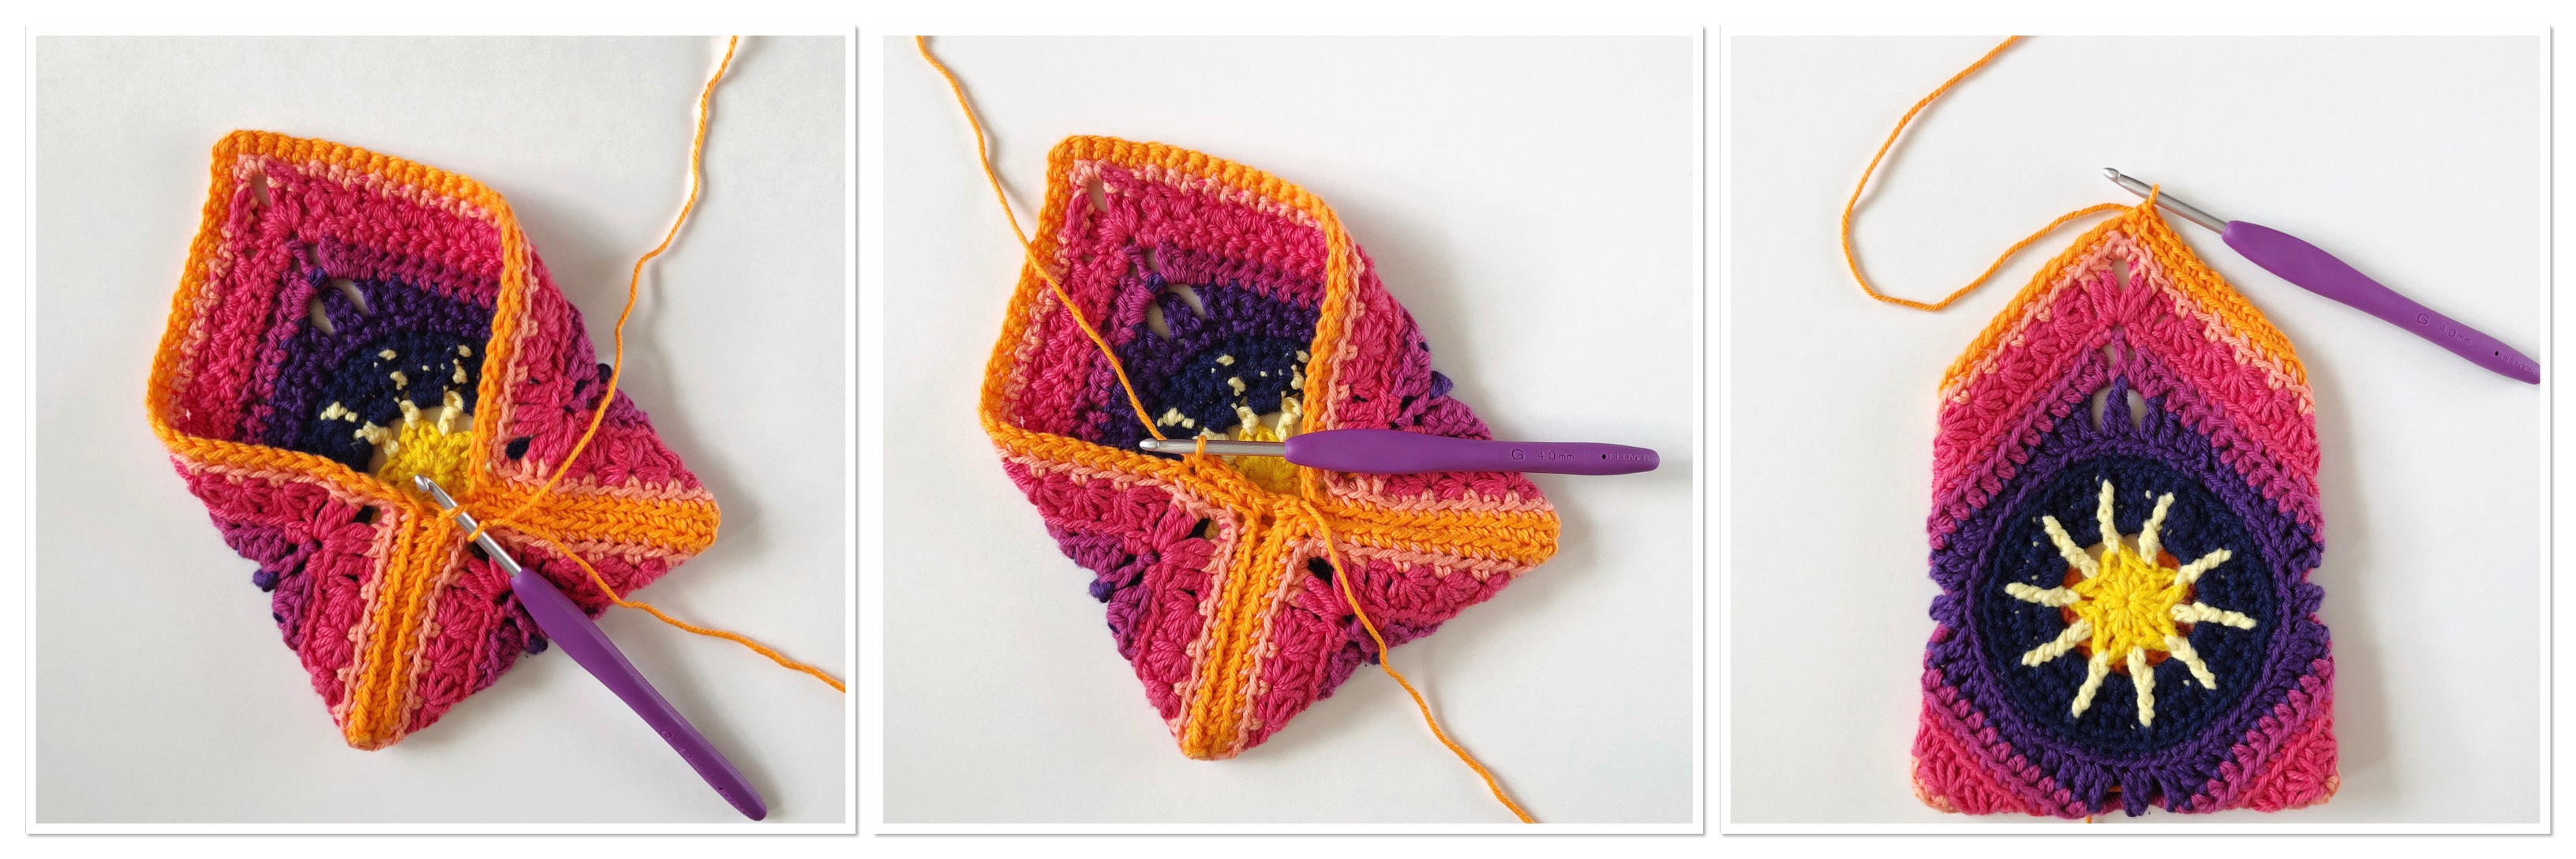
6. We are now going to make the loop for the button hole. You will need to make this the right size for your button so make the loop then test it. If it’s too big take out a couple of chains. If it’s too small add as many as necessary.
Ch 7 (or as many as you need)
Sc in the next st.
Sc in the blo of the next 27 sts.
Sc in the blo of the next 2 sts (these will be the 2 sts you crocheted into for the right hand side of the join).
You should now be back where you started.
Cut yarn and join to the first sc with an invisible join but don’t weave in ends yet. Tie a reef knot in the ends though.
(1 ch 7 loop, 30 scs)
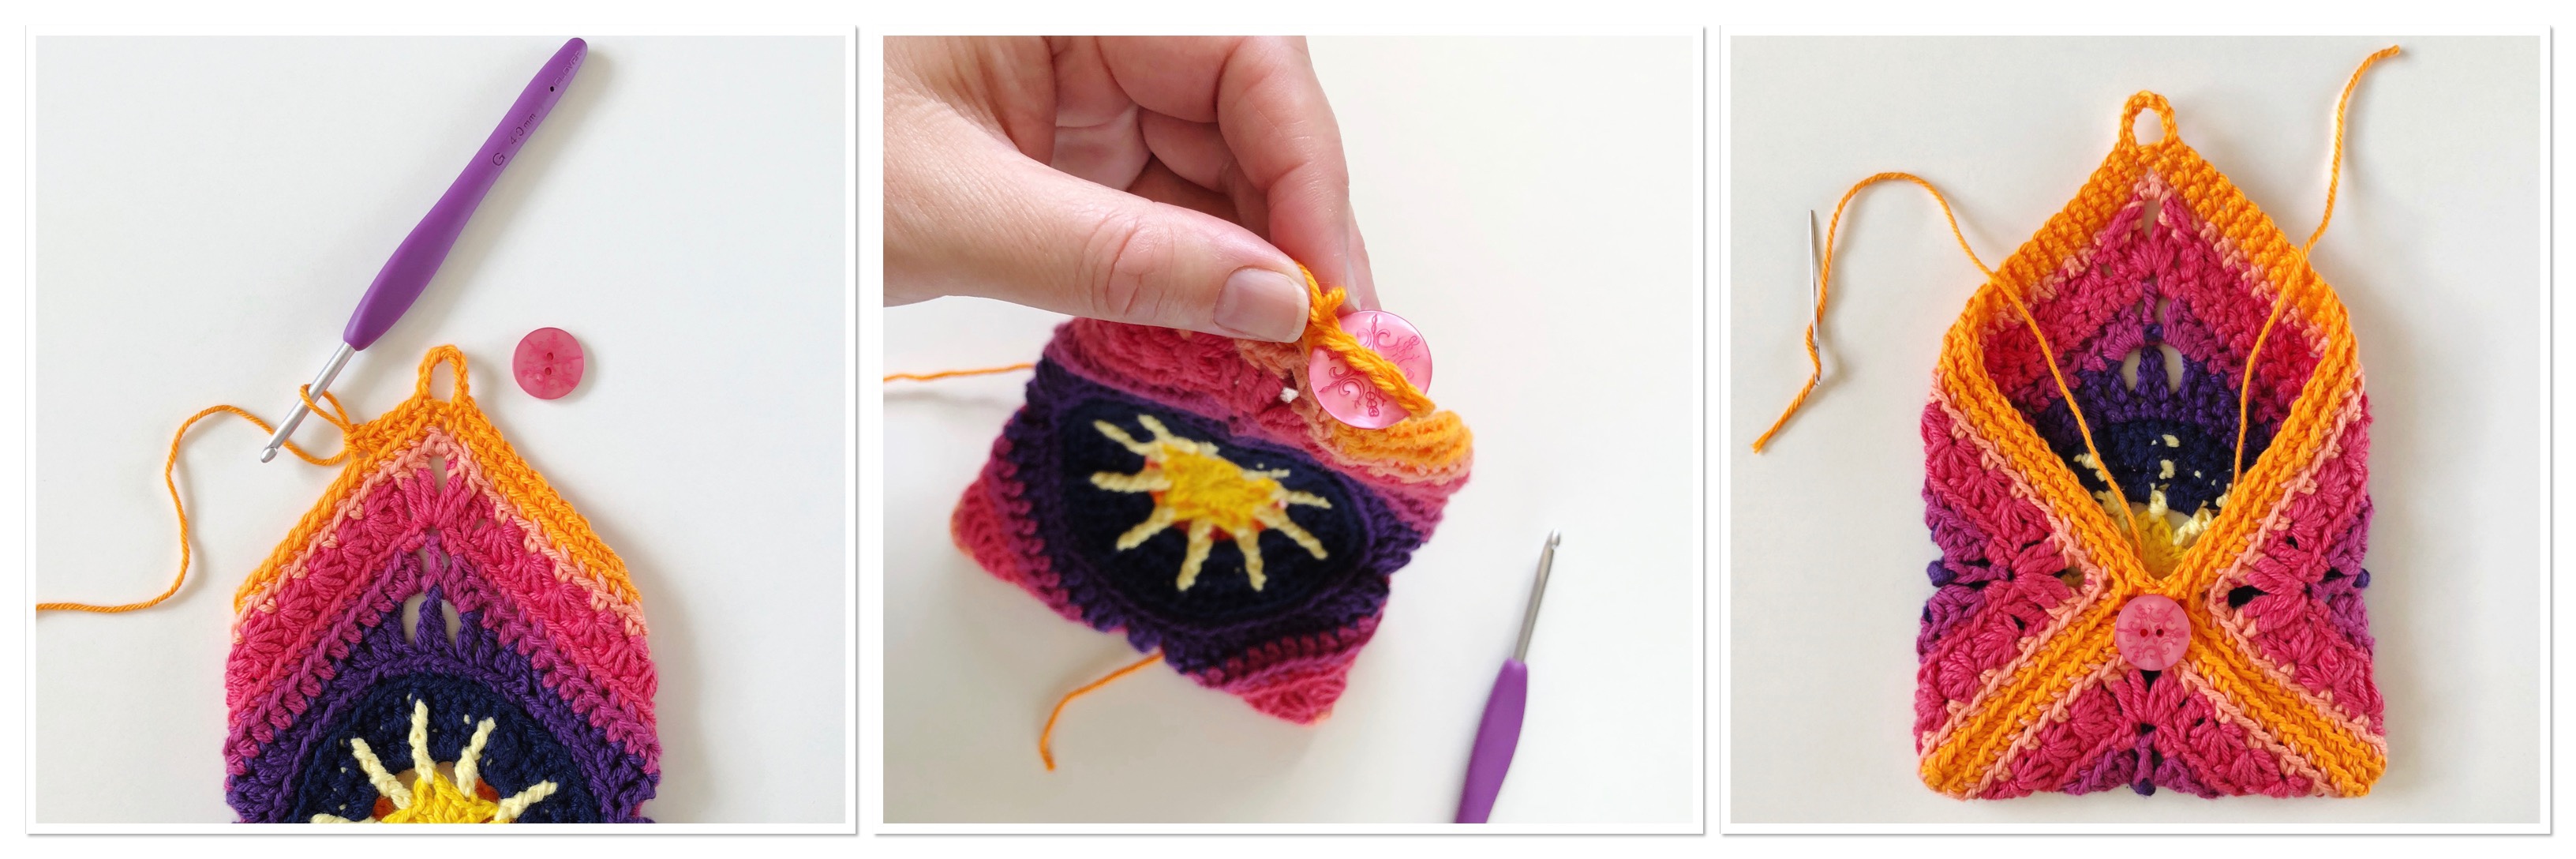
7. We are now going to add the button using one of the yarn tails.
First work out where you want the button to go.
Using a yarn needle, on the inside of the pouch weave the yarn down through the back of the sts to where you want your button.
Pass the yarn through the sts to the outside and sew on your button.
Check the button is in the best position to close your pouch then secure the yarn end to keep the button in place. I did this by tying the end I used for the button with the other yarn end in a reef knot before weaving in the ends.
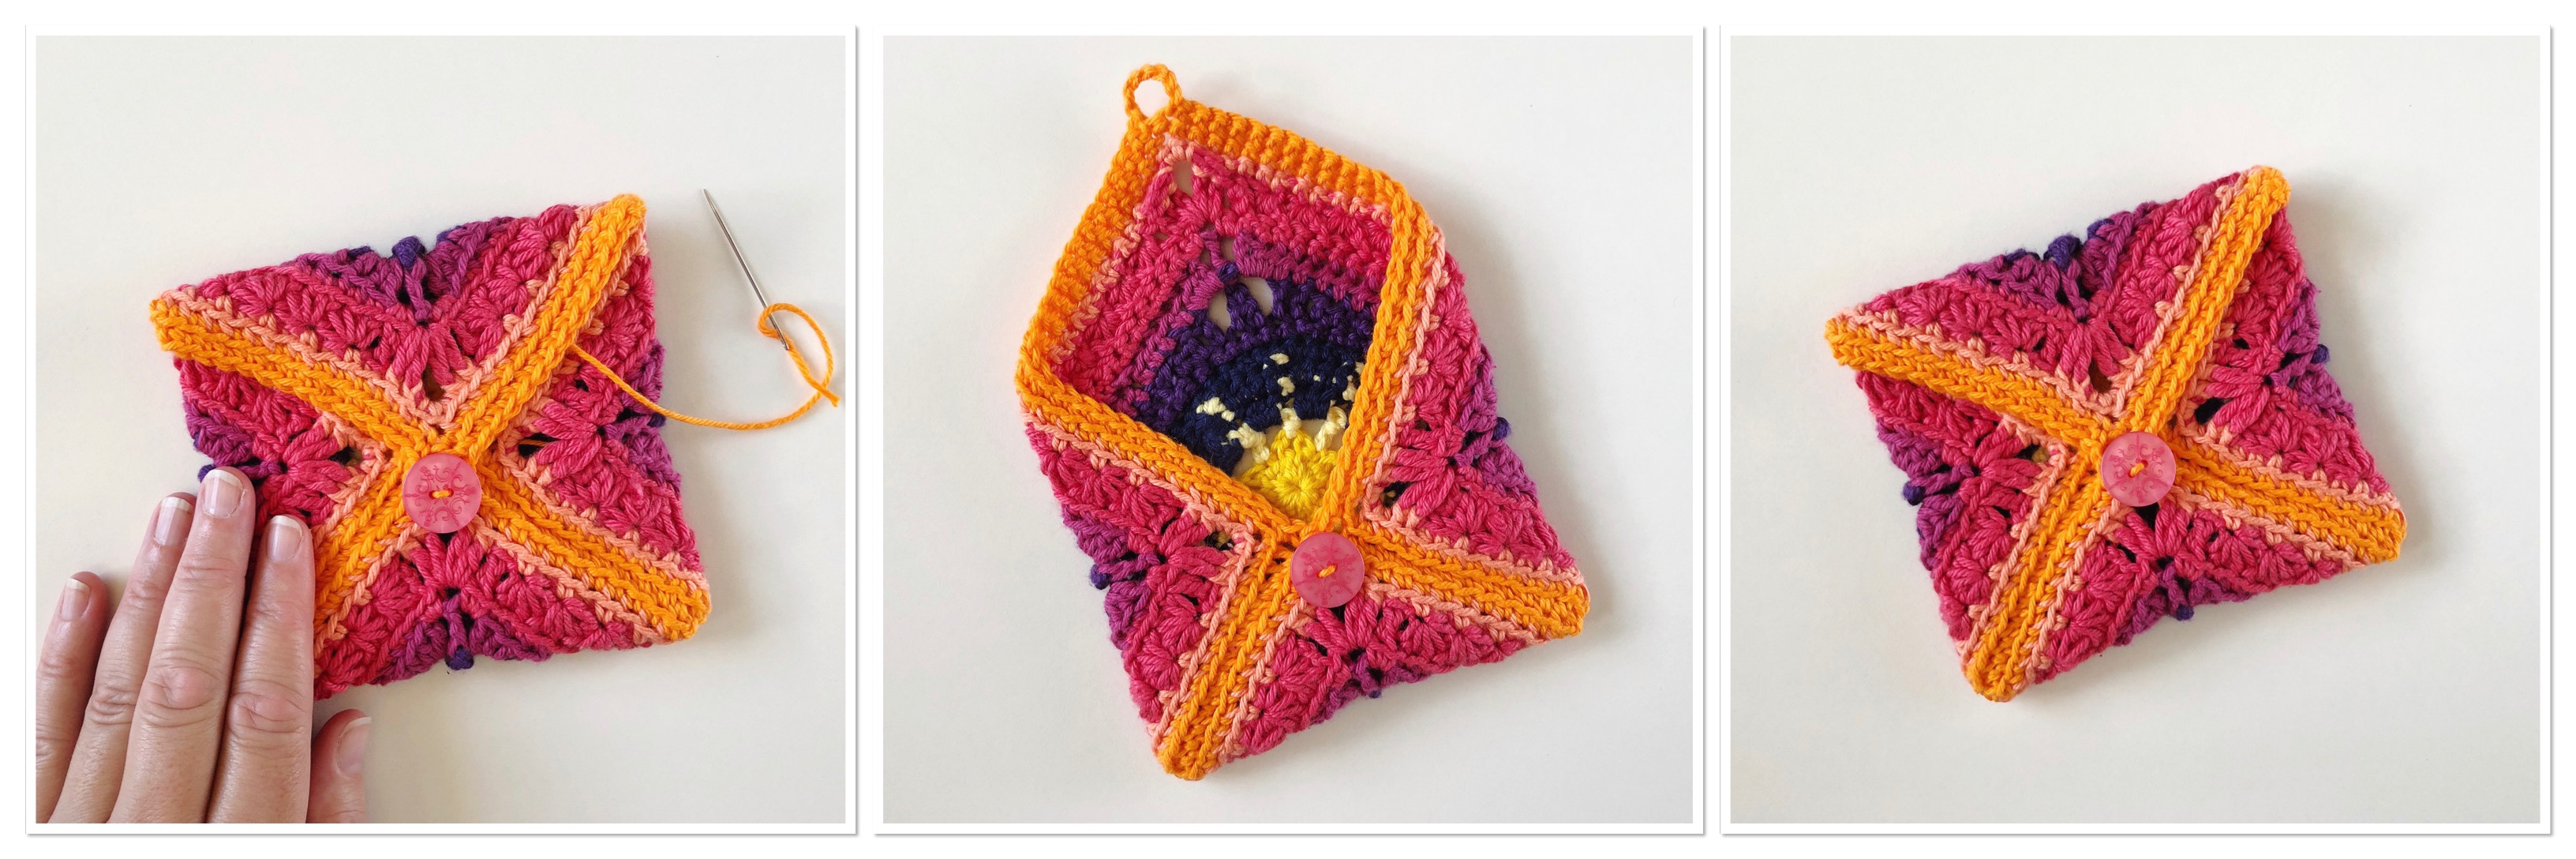
And that’s it, you’re done!
As you can see the pouch I made today is bigger than the original pouch I made for my ear buds. This is due to the fact that the yarn I used for the earbud pouch (Yarn and Colors Must Have) is a lighter weight yarn and therefore my square was smaller.
The 2 squares were the following sizes in their pre pouch form (flat – I could have just said flat 😂).
Rainbow Puff Square in 4ply / Fingering weight yarn: approx. 14cms (5 1/2in)
Tiny Star Square in 8plyn/ DK weight yarn: approx. 17cms (6 3/4in)
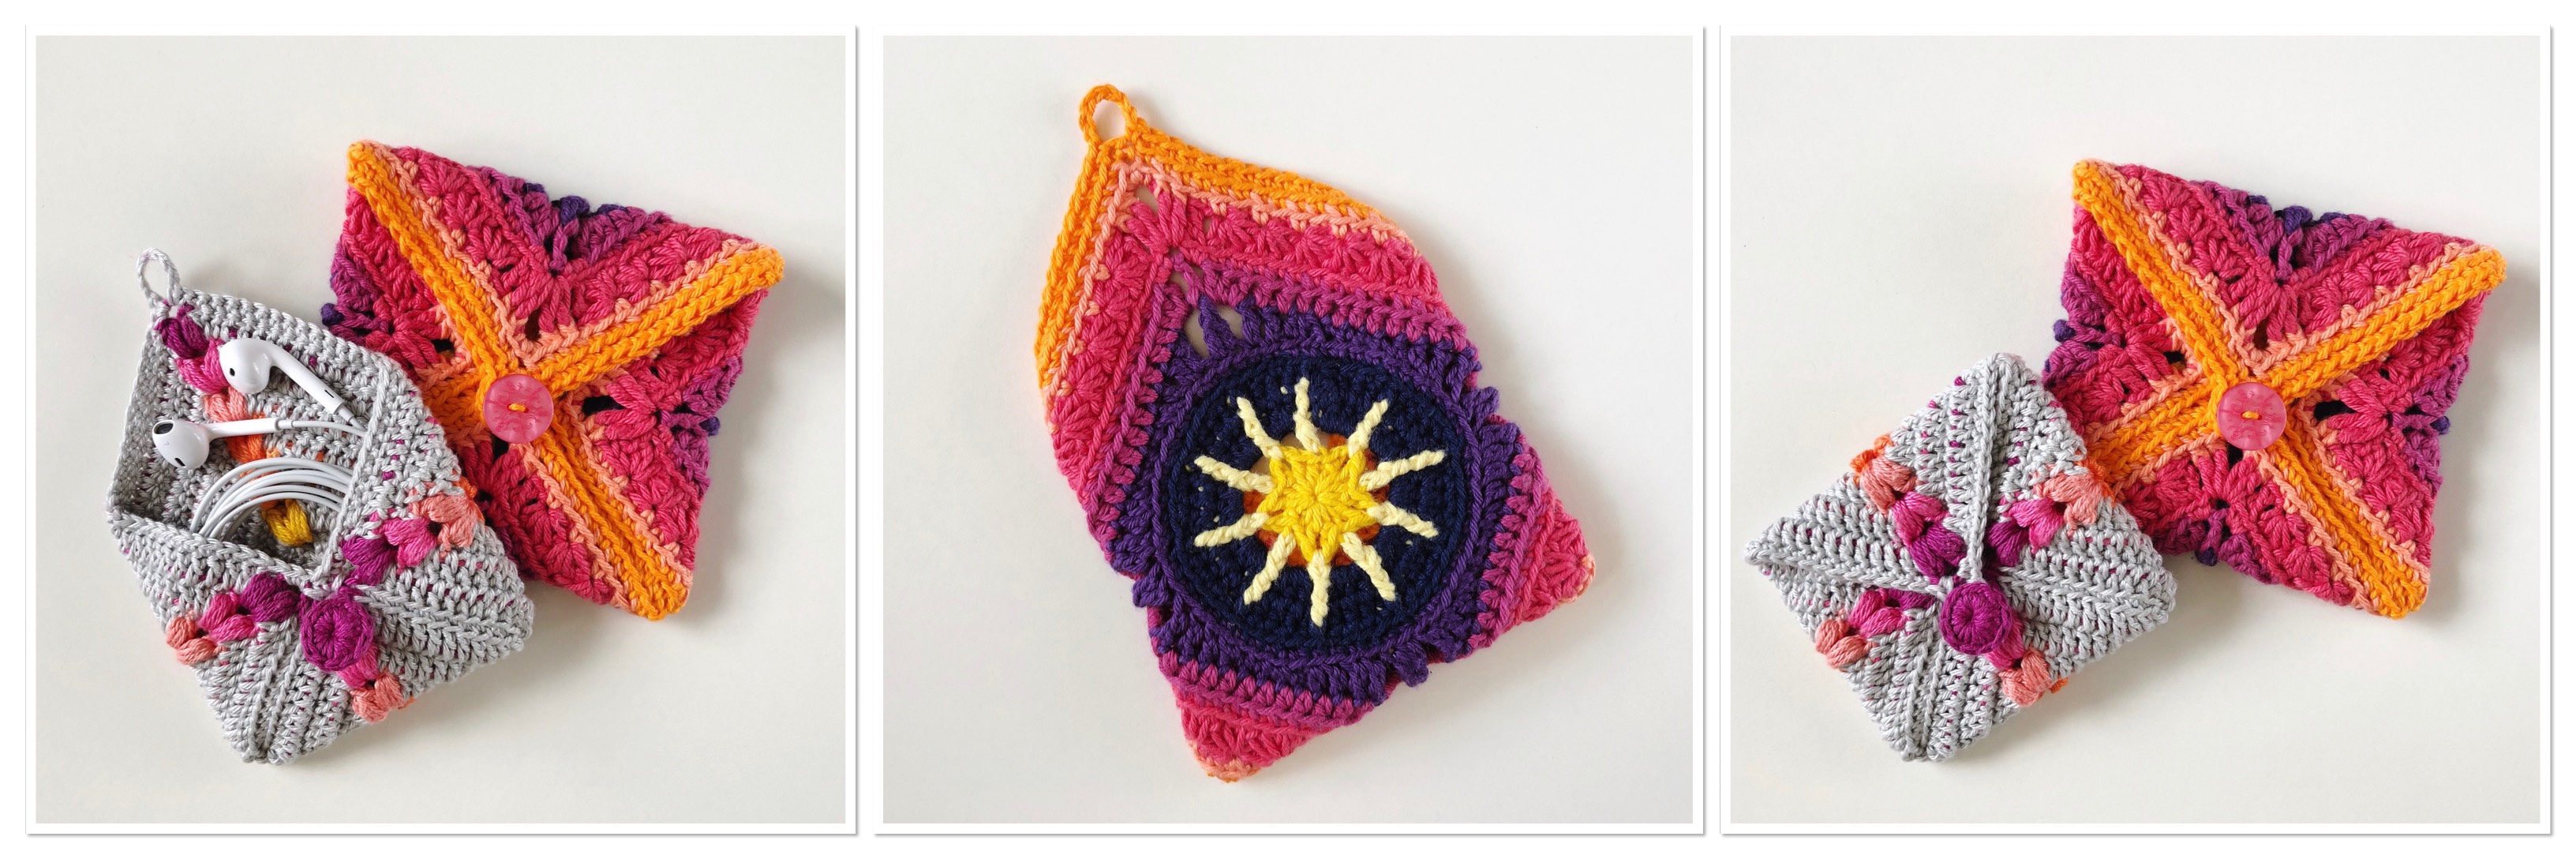
If you prefer to print out your patterns or would like to support my work you can purchase an inexpensive PDF from Etsy. The PDF also includes extras tips and a chart to help you create your own pouch.
Buy PDF on Etsy here! or Ravelry here!
If you do make a pouch I would love to see it, so send me a message, email or tag me online so I can send some love your way 💕
Now all that’s left to do is decide what you want to use your pouch for!
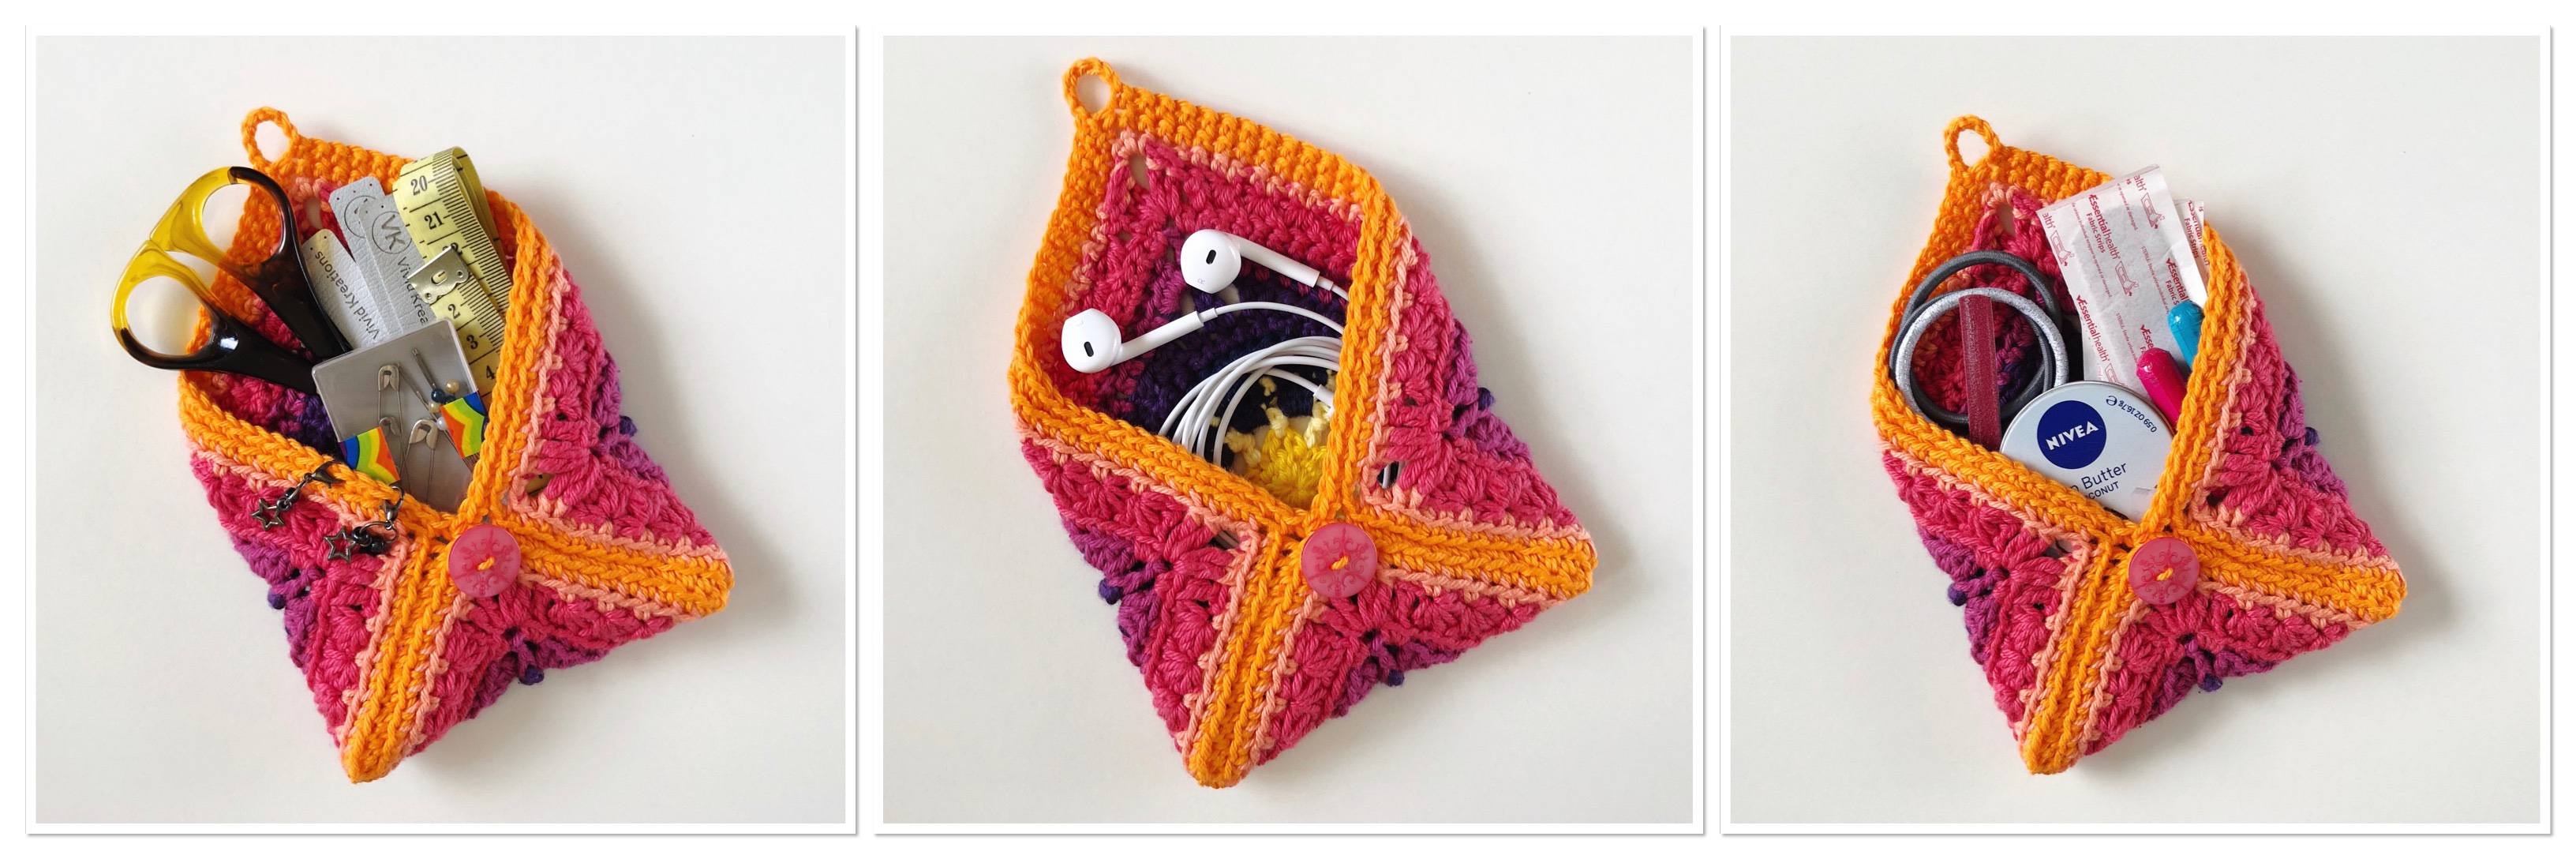


Amazing!
Eu vi no seu Instagram e corri para ver o post com o tutorial! Eu salvei no Pinterest pra não perder essa sua arte! Parabéns e muito obrigada por compartilhar!!!
Thank you Heloise and you’re welcome. I hope you enjoy the tutorial 💕
Really enjoyed your post. My Great Grand kids loved these little pouches. Thank You.
Thank you 😊 I’m glad you enjoyed the post and your great grand kids loved what you made them.
I made one for my granddaughter. First trial.
Yours are amazing! I’m just a beginner 😃
شرحك جميل
Thank you 💕
How do we find the pattern for the tiny star?? Is it on your blog?
Hi Elizabeth. The Tiny Star Square is a paid pattern by me. The links are in the blog post or on the Patterns page of my website.
There is a free pattern for the Tiny Star by itself on my blog – again you can find the link through the Patterns page on my website.
Thanks for a darling idea with so many uses such a gift pouch for jewelry or to carry a handkerchief/tissues in your purse. Dress it “up” or “down” depending on yarn used to make.
Thanks for the love Pamela 💕 I love your idea to use it as a gift pouch for jewellery! I’m going to keep that in mind for birthdays and Christmas.
Do you have the instructions for the rainbow puff square? Love the colors. Just purchased the pdf for the star square. Thank you!
Hi Amy, thank you so much 💕 The Rainbow Puff Square is a pattern by another designer. You can get her free pattern on her blog. I’ll pop the link below for you.
https://bycraftycc.wordpress.com/2018/03/10/rainbow-puff-square/
Hi Amy, thanks for this. I’ve been wanting a small ‘something’ to hold my rings and watch when I do djembe drumming. I had seen a drawstring pouch but it seemed a little too much for what I needed. This will be perfect! I’m sure to get some orders when I show it off! LOL Oh, have you checked out ‘Dorset’ buttons. They are amazing and so much fun to do. Maybe I’ll do one for this!
So glad these will be helpful for you 💕 I haven’t heard of Dorset buttons before but I’m off the look them up now!
I’ve bought the pattern for the single-colour tiny star square from ravelry, but I’d really like to change colours like you’ve done here to make the ‘rays’ stand out, it’s so effective! Do you have instructions for how to do this?
Hi Nicki, I don’t have formal instructions but I can tell you what I did for the colour changes. If you send me an email from the contact page, I’ll send you some details about what I did. Cheers, Mikaela.
I would like to make this, but I cannot find the granny square or figure out exactly how to turn it into a pouch. I figured out up to seaming the joined edges. After that I was lost. I will look else where for a pattern.
Hi Sharon, I’m sorry that you are having trouble with the tutorial and finding the information you need. The links for the granny squares used are provided at the beginning of the post, one is a free pattern by another designer and the other is a paid pattern by me.
As for where you got lost, if you can provide me with some more specific information about where you are confused I am happy to help you figure it out – it may even help someone else if they are having trouble with the same part!
Cheers,
Mikaela
This would be good for gift cards too.
Could even hang them on the tree until you give them out at Christmas.
Great idea you had!
Thanks 💕 They would be good for gift cards! I’ll definitely have to remember that come Christmas this year 😊
Thank you for this brilliant idea and tutorial. I first saw it in your @Insta feed and thought what a great use of that pile of “spare squares”.
Making little gift sachets and pouches now. Our little Yarn group up here on the Sunshine Coast make a lot of items for gifting and as “keep of the gifting stash” I have a pile of odd sized squares here that now will have a new use.
Beautiful
You are absolutely welcome Judy! I have made a bunch of these using spare squares now and I keep finding new uses for them, which is fun.
I hope you and your yarn group enjoy making them and your gifts are always appreciated.
Cheers,
Mikaela 💕
This is just beautiful. All your work is just beyond words. I sure do hope you have a book published already, or one that is in the works. You should be proud of your designs, you are so talented. Love this by the way!
Thank you so much Mary xx I really appreciate the love.
I don’t have a book of my own yet but I do have 3 designs in the Granny Square Sourcebook which is beyond exciting for me.
Cheers,
Mikaela 💕
My dear Mikaela, you have caused a tsunami of squares! I made a couple as gifts, only to have lots of folk asking for them, some big, some small, all colours wanted! Now i am working on lining my latest personal one just to see how it will work out.
Thank you for the inspiration!
That’s wonderful to hear Jan! A tsunami of squares has a great ring to it 😄 I love how versatile these little pouches are and I love seeing other people put their own spin on them. I hope lining your pouch turns out really well and I’d love to see a pic if you want to tag me or send me one.
Cheers,
Mikaela
HI I MAKE “SOAP BAGS” FOR THE SHELTERS SO WILL TRY AND FIGURE OUT HOW TO CLOSE THEM WITHOUT A BUTTON AS THIS COULD POTENTIALLY SCRATCH THE BODY…BUT I HAVE TO BE ABLE TO OPEN THEM EASILY SO THE SOAP CAN BE REPLACED…ANYONE OUT THERE HAVE ANY IDEAS THEY WOULD LIKE TO SHARE AS TO HOW I CAN DO THIS???
THANKS FOR THE GREAT IDEA
YVONNE
Hi Yvonne, using these pouches for soap bags is a wonderful idea.
You could try making a crocheted button like my grey pouch, as that would be more gently than a plastic or wooden button. Or you could try making a tie (chained or even a ribbon) for it that you tie through the button loop. Either way it’s an awesome thing you are doing.
Cheers,
Mikaela
I tried following step by step and mine came out sort of wonky. I really loved the idea though, I will be experimenting for ages to get perfection!
I’m sure you’ll get the hang of it and I’m happy to help if you need it.
First thing I’d suggest is to look at whether it’s the square of the joining into a pouch that made it wonky, then you can figure out where to start experimenting for the next try.
Let me know how you go.
Cheers,
Mikaela
It seems a foolish question, since the pouch quite obviously can be made from whatever size square one wishes, but, well, what sizes did you start out with? Are we talking a 6″ square, or larger or smaller? Thanks! I love the detailed instructions you offer for making these little darlings.
The 2 squares I made were the following sizes when flat (before turning into a pouch).
Rainbow Puff Square in 4ply / Fingering weight yarn: approx. 14cms (5 1/2in)
Tiny Star Square in 8ply / DK weight yarn: approx. 17cms (6 3/4in)
What I’ve found helpful when trying to make a certain size is cutting a square of paper and folding it to see if the pouch will be the size I want.
I hope that helps Brenda and thanks for the love for the pattern xx
Thanks for a fun and useful pattern! One minor bit of info that you might want to add: you assume that our squares have an even number of stitches per side. What if we have a square with an odd number per side, as I did? No problem, I just started section 3 with a slip stitch into the middle stitch of the side. Then I had an even number of stitches left unworked, so I did a sc into the stitches on either side of the middle, and the next pair, and so on.
That’s an excellent solution for working with a square with an odd number of stitches per side. Thank you for the suggestion and I’ll add it in when I get a chance. Cheers, Mikaela xx